Build a DIY Cardboard Haunted House for Kids
A plain delivery box can become a spooky Halloween decoration with paint, paper, and a little imagination. This cardboard haunted house craft for kids works well for a weekend activity, classroom project, or Halloween afternoon at home.
The project is suitable for children ages 6 to 12. Younger children can decorate and paint, while an adult handles thick cardboard and detailed cutting. The active craft time is about 60 to 90 minutes, followed by drying time.
By the end, your child will have a small haunted house with windows, a door, spooky details, and the option to add a battery-operated light. Use an old shipping box, cereal box, or small package box so the project also gives household cardboard a second use.
Set up a protected table before you begin. Keep the craft area clear, gather all materials, and let the paint dry fully before adding paper decorations.
What You Need
- One clean cardboard box
- Pencil and ruler
- Scissors
- Craft knife for adult use
- Black, gray, purple, orange, and white paint
- Paintbrushes
- Construction paper
- Glue
- Masking tape
- Battery-operated tea light, optional
At a Glance
- Cover your craft table.
- Choose a strong cardboard box.
- Mark the house openings.
- Cut the windows and door.
- Add the roof shape.
- Paint the haunted house.
- Create the windows and door.
- Make spooky decorations.
- Add lights safely.
- Display the finished haunted house.
Cover Your Craft Table
Spread newspaper, a washable tablecloth, or a large sheet of scrap paper over the work surface. Place the cardboard box in the middle and keep the paint, glue, scissors, and ruler within reach.
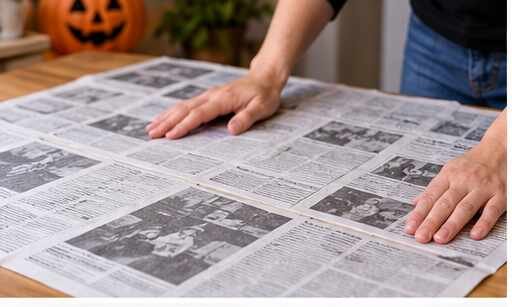
Protect the floor if you are working indoors. Keep a cup of water nearby for paintbrushes and a separate cloth for spills. A clear table gives children room to turn the box without knocking over supplies.
Choose a Strong Cardboard Box
Select a dry box that is large enough to decorate but small enough for your child to handle. A shipping box, cereal box, or small delivery box can work well.
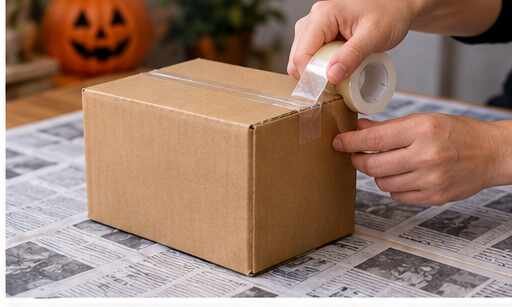
Close any open flaps with masking tape. Press the sides gently to check that the box stands upright without collapsing. If the cardboard feels soft or damp, choose another box because paint and decorations may make it bend.
For a tabletop version, choose a box about 10 to 14 inches tall. A smaller cereal box works well for younger children.
Mark the House Openings
Use a pencil and ruler to draw one front door and several windows on the outside of the box. Leave at least 1 inch of cardboard between each opening so the walls remain strong.
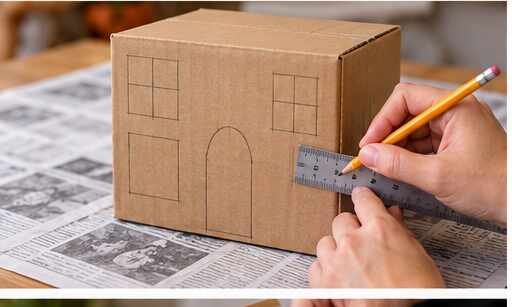
Make the shapes large enough to see after painting. Try pointed windows, tall arches, or uneven shapes for a spooky look. Draw lightly so unwanted marks can be covered with paint later.
Do not cut yet. Check all sides of the box first and decide where the front, back, and side details will go.
Cut the Windows and Door
An adult should handle thick cardboard or use a craft knife. Children can use scissors only with close supervision and only when the cardboard is thin enough to cut safely.
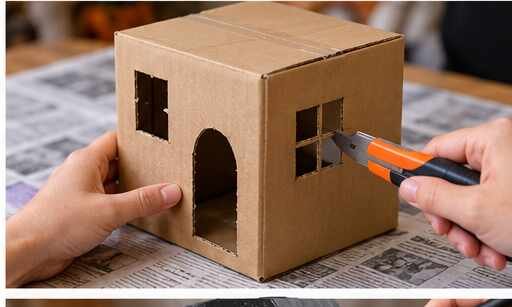
Follow the pencil lines slowly. Cut the door on three sides if you want it to open, or cut it out completely if the house is only for decoration. Leave the windows open or cover them later with yellow paper.
Add the Roof Shape
Fold the top flaps inward to form a roof. If your box has no usable flaps, cut two cardboard rectangles that are each about 2 inches wider than the house.
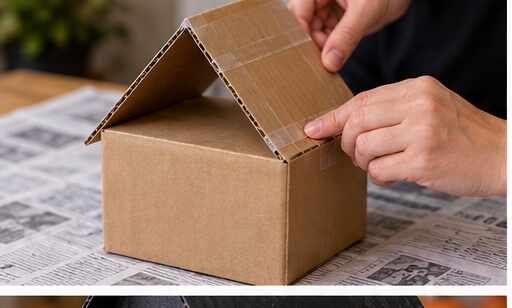
Place the pieces together at the top and secure them with masking tape. Leave the roof slightly uneven if you want an old haunted-house appearance. Press along the tape so the roof stays attached while you paint.
A cereal box may need extra tape along the roof because its cardboard is thinner.
Paint the Haunted House
Choose a base colour such as black, gray, dark purple, or brown. Apply a thin coat with a medium paintbrush and cover one side at a time.
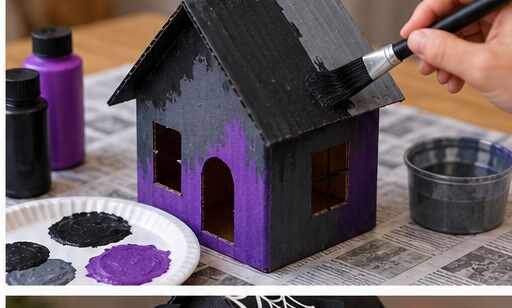
Let the first coat dry for about 30 minutes before deciding if a second coat is needed. Thick paint can make cardboard soft, so use two thin coats instead of one heavy coat. Leave the window openings clear if you plan to add yellow paper behind them.
Allow the painted house to dry for 1 to 2 hours before attaching decorations.
Create the Windows and Door
Cut rectangles or arches from yellow, orange, and gray construction paper. Glue the pieces behind the open windows so the house appears to have light inside.
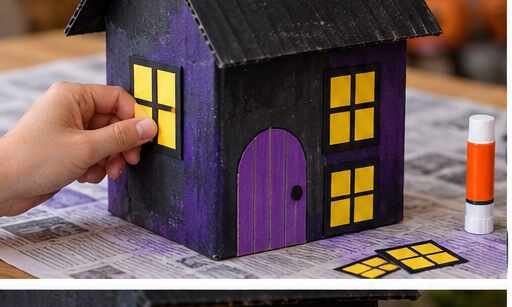
For the door, use brown, black, or purple paper. Add a small paper doorknob and a few thin strips to look like wooden boards. Keep the glue layer thin because extra moisture can cause the cardboard to curl.
Let the paper pieces sit for about 10 minutes before moving the house.
Make Spooky Decorations
Cut bats, ghosts, pumpkins, crooked trees, or small gravestones from construction paper. Add these details around the outside of the house with glue.
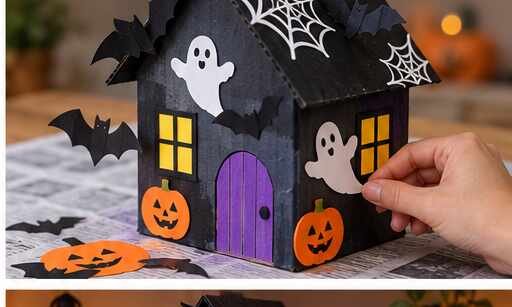
Children can draw faces on the ghosts, add orange windows, or create a moon for the roof. Use white paint or a white crayon to add cracks, bricks, spider webs, or spooky messages.
Leave some open space on the walls. Too many decorations can make the house look crowded and may cause small pieces to fall off.
Add Lights Safely
Place a battery-operated LED tea light inside the haunted house if you want the windows to glow. Use only battery-operated lights. Do not use candles, matches, or any open flame near cardboard.
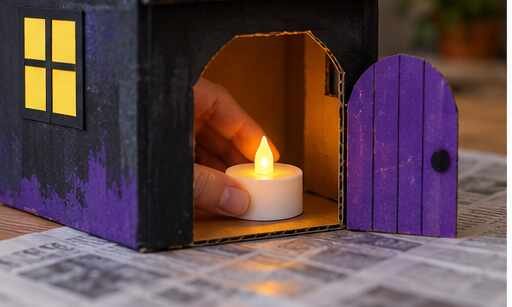
Set the light on a flat surface inside the house. Check that it does not touch the walls or paper decorations. Keep the battery compartment closed and remove the light when the house is not being used.
Test the light before placing the house on a shelf or table.
Display the Finished Haunted House
Place the completed haunted house on a dry, stable surface where children can see it. A bookshelf, craft table, mantel, or bedroom shelf can work well.
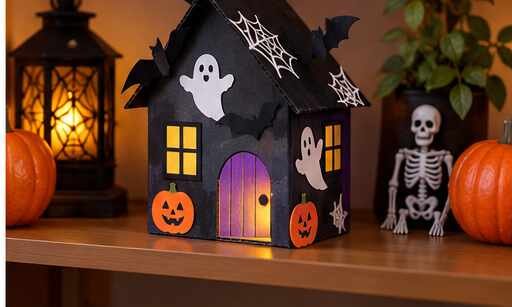
Keep the house away from water, heaters, open flames, and areas where it may be knocked over. Add a small paper path, cotton-ball clouds, or paper bats around the base to complete the Halloween display.
Remove the battery-operated light after use and store the house in a dry place.
Troubleshooting
| If This Happens | Try This |
|---|---|
| The cardboard bends. | Use less paint and let each coat dry before adding another. |
| The roof will not stay in place. | Add masking tape inside the roof and press it firmly against the cardboard. |
| The paper decorations fall off. | Use a thin layer of glue and hold each piece for about **20 seconds**. |
| The paint looks uneven. | Allow the first coat to dry, then add a second thin coat. |
| The house becomes too heavy. | Remove thick decorations and use paper instead of heavy objects. |
Frequently Asked Questions
What type of box works best?
A dry cereal box or small shipping box works well. Choose cardboard that stands upright and does not bend easily.
Can children make this craft without paint?
Yes. Cover the box with construction paper, scrapbook paper, or brown paper bags. Add drawings and cut-paper decorations afterward.
How can I add lights?
Use a battery-operated LED tea light. Do not use candles, matches, or any other open flame because cardboard and paper can burn.
Can the haunted house be used as a toy?
It is best used as a decoration. If children use it for pretend play, check the cardboard, tape, and decorations regularly for loose or sharp parts.
How long should the paint dry?
Allow about 30 minutes between thin coats. Let the finished house dry for 1 to 2 hours before adding paper decorations or lights.
Can younger children make this project?
Children ages 3 to 5 can help with painting and decorating while an adult handles cutting. Children ages 6 to 12 may complete more of the steps with supervision.
Quick Reference Card
What You Need
Cardboard box, pencil, ruler, scissors, paint, construction paper, glue, masking tape, paintbrushes, and a battery-operated LED tea light.
Steps
- Cover your craft table.
- Choose a strong cardboard box.
- Mark the house openings.
- Cut the windows and door.
- Add the roof shape.
- Paint the haunted house.
- Create the windows and door.
- Make spooky decorations.
- Add lights safely.
- Display the finished haunted house.
Final Thoughts
Your child has turned a recycled cardboard box into a Halloween decoration.
Display it on a dry shelf or craft table and add extra paper details if needed.